Title: How to set up the system
Author: Gedalia Pasternak
Created: Nov 1, 2K
Last modified: December 12, 2K
To do:
Installing the system
Copy BoneExp.dle into your max plug-ins directory. Depending on your install
you may have to compile the exporter as well. The BoneExp exporter creates 2
exporters a Binary Mesh Exporter available via the export menu. As well as a
Skeletal animation file format. The BoneExp project started as part of a
discreet open source project called Dejaview a basic skeletal system exporter
and playback system. You can find the original code on Discreet's website.
Place the files in the Maxtools Directory in the appropriate maxscripts
directory. Note: I usually place the macroscripts onto a customized toolbar and
access them that way.
How to set up the system
Approximate time to initially set up the model is
under 3 hours. The majority of the work is weighting the jaw with the skin
modifier.
Building the muscles
|
Assuming that you have the tool bar set up. Click the build muscles button.
This should create the default facial armature.
Note: I've found the maxscripts plugins to be a bit buggy. If the script
crashes you may have to plunk down a random object and add a muscle and a
circular muscle modifier to it. This seems to initialize the modifier properly
and you can the properly run the build muscles script.
Alternatively, you can just merge in an existing armature.
The result should be the following (without the mesh):
One big thing to be aware of is that some of the muscles (forehead, limited) the parameterization on the eyelids expect that the face's
plane of symmetry is the yz plane. That the right eye is at [-x,y,z] and the left eye is at [+x,y,z]
|
|
Editing the muscles
|
Visibly there are two types of muscles a line and a circle. These mostly correspond
to human anatomy. Any book on drawing faces should have at least an introduction
to the way that muscles change shape of the face. The set up I have isn't
perfect, but its gotten good results. I'm not so sure about the areas around the
furrow of the brow and the upper and lower lip anatomically are actually 4
muscles not 2.
You can change the muscles by changing the position of the objects as well as
a number of custom variable that are set up in the following modifiers.
These modifier plug-ins
changes 2 basic muscle types into 6 types (seen to the right
|
|

|
|
Standard muscles: linear, limited, cheek, forehead.
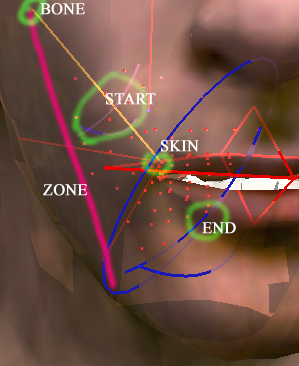
The various parameters:
-
Start - the distance from the start
of the muscle that the muscle stops pulling at. This is how the
wrinkles are achieved and keeps verts from winding up at the bone
anchor of the muscle. The inner blue arc. This value should actually
be a percentage but that wasn't changed in release 1.0
-
End - the percent beyond the
end of the muscle that the muscle still pulls at. This is visually
represented by the outer blue arc
-
Angle - In the code called zone, is the angle of the
cone of the muscle.
-
Clamp - the strength of each contraction of the
muscle, the lower the weaker the change. If you
Additional Limited params Limited muscle is only used
around the mouth it does a path walk to make sure the upper lip doesn't
get tagged along with the lower lip.
|
 |
|
Sphincter
muscles: the
mouth and eyes
Represented by Circles where the xyz pos of the circle is exported as
well as scale factors (note: hitting reset scale on the mouth or eyes will mess
up the sizing of the muscle.)
Currently
the mouth and eye have the same behavior.
The various parameters:
-
Orientation - this is the direction that the
muscle pushes, when your mouth puckers in the image to the right
every point moves uniformly in the -y axis. Therefore the
orientation is Y and the yfactor is going to get added onto the
vert.
-
xyz factors. This is how much the verts are either
squeezed towards the center of the muscle or pushed depending on
the orientation of the muscle. For the mouth there is a strong
amount in the x, and little in the Z. For the eye there is no X
motion but a bit of Z motion.
I'm not explaining this as well as I should, so try it
out and see what results you get.
|
 |
For addition info on the behavior see the API docs
Exporting the Muscles:
Run the export Muscle script. things to be aware of:
-
The script ID's things by name so if you start renaming
muscles they aren't going to export unless you change the export script.
-
If you start deleting muscles with out changing the export
script the number of muscles in the Muscle file will be wrong and the reader
will probably crash.
Setting up the mesh:
Without biped:
 The system need a specific set up to work properly:
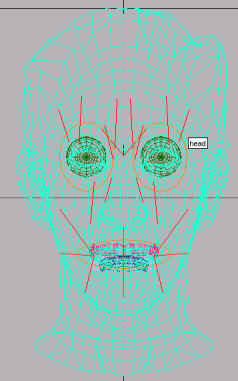
The Actor class system looks for specifically named objects the
which are then handed to the Facial animation systems to control. These are
head, righteye, lefteye, JawRoot, and tounge. The
JawRoot should be parented to the head and the tongue to the jaw. Other wise
rotations will not be properly hierarchal.
With biped:
All most the same thing except that the root parent for the eyes, jaw
etc should be the Bip01 Head bone. I suggest that you name your biped
Bip01. The system specifically looks for Bip01 Head and Bip01 Neck bones.
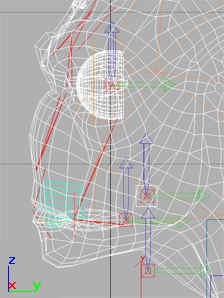
Pivot Points
With the release of the skeletal functionality, most transforms
happen in local space. Local space in 3ds max is defined by the pivot
point of an object. if you're getting odd rotational behavior with your
exported model check the pivots All pivot pivot points should be aligned
with the world axis as appears to the right.
That is: the x axis of the pivot should point to the left and
right of the model. The Z should point toward the head and the Y towards
the back. |
 |
Exporting the Mesh:
Select the meshes and the jaw helper object (I suggest making
them into a selection set) and hit File>export to binary mesh format.
Setting up and exporting the tagged point data
The eyelids
This is probably the most heinous part of the system. There are 3
selections that the system need to properly function. A right eyelid, left
eyelid and a jaw. These selections are shown to the right.
Red denotes a weight of 1, fading linearly to one. The right and left sets
should be set up as named vertex selection in the edit mesh modifier. Then
exported with the export selection command.
The right and left eyelids are actually another parameterized
component of the system. The points that should be tagged should include
the far left and far right most points of the eye (in the x axis). These
are assumed to be a hinge that the rest of the eyelid revolves around.
I've had decent results with this.
The Jaw
Is probably the most work to set up. Its a traditional weighted list of
points set up with COM_Skin or the skin modifier. Add a Skin modifier add
a bone, weight the influences and export them. It can be fairly tedious to
do, max 3.0 is just not so good at it.
The exported COMweights command is used to export the data from the
COM_skin modifier. The skin modifier may also be used with some slight
modifications to the script.
Edit the Results
The reason that these exporters are done with maxscript is because they
are very simple. Unfortunately they don't give the easiest to control
output. The result of step one and two is a text file that should be
combined to look like one of the sample tagged.dat files.
The form is as follows (the comments added for explanation should not
be in file)
#lefteyelid unweighted // name of list and type
49
//number of verts in list
"102"
//vertex 1 in list the modifer usually output quoted numbers either on
should work
"103"
//vertex 2 in list
......
#righteyelid unweighted // same bit
49
955
956
.....
#Jaw weighted
293
//number of verts
0
//vert number
0.2
//wieght of vertex
79
1.0
83
0.4
......
FAQ:
What's with the red dots?
Those are the tagged points, they are parametrically generated from the
above settings and keep the number of points that the system has to deform to a minimum.
Why can't I just use morph targets?
You can, however I should point out the "parametrically
generated" part about. One of the main advantages of this system is that
the muscles work regardless of the number of points in the mesh. You can have
your character talking before the mesh is finished. and not have to worry about
adding verts.
What about the jaw and eyelid those are tagged points
oops, This is true. The eyelids are pretty easy to redo. I'm going to sponsor
a contest on the best way to parameterize the jaw, Cause weighting those points
is a total bitch.